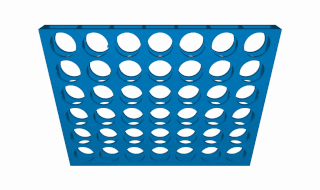
Ooh, I wonder what that game could be!

Inspiration
It has been on my mind for a long time to try and create a game, more specifically Connect 4, since I thought this would be a great way to learn a little bit of Swing and create something that I would enjoy playing. To begin, I wanted to visualize the board and the functionality behind the game.
Main Ideas/ First Thoughts
The first idea that came to mind when thinking about the functionality behind the game, was utilizing a 2d array to represent the spaces in the game. I felt that if I could simply the game to just numbers in a 2d array, the “main frame” of the game will be easy to build.
Moreover, I felt that I could represent the red and yellow chips as integer values, like 1 and 2 for instance. By representing the the chips of the games as integers, I could simplify the game even further.
Onto the matter of the Graphical User Interface, my thinking was quite straight forward, lets essentially emulate what a Connect 4 board looks like, and how the game is played. Expanding further, I wanted to create the game so that the player would have to drag the chip over the column and drop it the column (see below).

Creating the frame and GUI for the game
To make this GUI, like previously stated, I used SWING, a GUI toolkit for Java. In SWING, there are components called JFrame, JPanel, JButton, and so forth. The JFrame, like the name suggests, is essentially the structural component holding all the components of the game together. Similarly, the JPanel also holds components like JButtons together, but it itself will be held by the JFrame. Do not worry about the names at all.
public void startUpGame(){ //creating the start of the game
    frame = new JFrame("ConnectF : (Local : Human vs Human)");
    frame.setVisible(true);
    frame.setSize(618,612);
    frame.setDefaultCloseOperation(JFrame.EXIT_ON_CLOSE);
    playerRed = true; }
The code above produced the following:

Now, with the frame of the game working, I decided to start adding in the components and emulating the style of the Connect 4 game.

To elaborate more on the JPanels and JButtons, if you look at this board, you will distinctively see that there are 3 sections to this board, the red section up top that contains “drop buttons”, the middle blue section that looks like the blue Connect 4 board, and finally the bottom gray section with the reset buttons. Basically, these 3 sections are different JPanels that contain JButtons that will be utilized for different uses, though the JPanels can contain many different things. For instance, the “drop button” will place the chip in the designated column, and the gray panel at the bottom will help the player reset aspects of the game.
To generate this, I created 3 distinct JPanels and added all of them to the JFrame.
public void createDropPanel(){
    panelForDrops = new JPanel();
    panelForDrops.setBackground(Color.red);

for(int i = 0; i < 7; i++){
        JButton temp = new JButton("drop button", black);
        temp.setOpaque(false);
        temp.setContentAreaFilled(false);
        temp.setBorderPainted(false);
        temp.setForeground(Color.red); \\makes buttons invisible
        panelForDrops.add(temp);
        drops[i] = temp;
 }
    frame.add(panelForDrops, BorderLayout.NORTH);                         }
The code up top creates this:

The red heading up top is filled with invisible buttons that will trigger when the user clicks them to drop a piece in a column.
You can do this step many ways, but I used a for loop to make invisible “drop buttons” and add them to the top most red panel. These drop buttons are there to basically emulate the action of dragging the chip over the column and dropping it the chip in the column.
Using the same principles as shown by the following code, we can create the bottom 2 panels and add it to our frame.
More specifically, for the blue panel in the middle, we can utilize something called a “grid layout” to structure our JButtons as shown below.

//the panel for the blue board in the middle
public void createButtonPanel(){
    panelForButtons = new JPanel();
    panelForButtons.setBackground(Color.BLUE);
    panelForButtons.setLayout(new GridLayout(6,7));

for(int i = 0; i < places.length; i++){
     for(int j = 0; j < places[0].length; j++){
                JButton temp = new JButton(i + " " + j);
                panelForButtons.add(temp);
                places[i][j] = temp;
        }
    }
    frame.add(panelForButtons);
}
The code up top produces this:

Functionality
Onto the matter of functionality, I wanted the board to be such that when I clicked one of the invisible drop buttons with my cursor, the first available JButton should contain the chip, and the 2d array that we use to model the game should hold the integer value of that chip. Let me explain further with images:
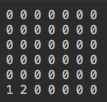
This state of the Connect 4 board, if we associate a red chip with the value 1 and a yellow chip the value 2, should be represented as the following.
Now, the tasks we must accomplish are as follows:
- Obtain icons of the chips
- Find the lowest available space in the board
- Change image icon of the lowest available space
Obtain Icons of the Chips
In this step, I simply had to find white or red circles with transparent backgrounds, and crop them so they can “fit” inside the blue panel JButtons.
In addition to downloading these images, I need to find a way to actually use the images as an Icon, so I can actually view these chips on the blue panel. Easier said than done however, as I had a lot of trouble even accessing these images even though they were right next my program class. There were a ton of Java Run Time Errors since my images were considered as null.

Thanks to Stack Overflow, I found a way to get these images to work using buffered images and the ImageIO reader, and I was able to fix this dread null pointer exception.
Since my images are now recognized, I can manipulate the image icons of the JButtons in the connect 4 board or “panelForButtons” to show the red and yellow chips:

Awesome! Now that we got the images working, let’s start working on “dropping” the chips into the board.
Find the lowest available space in the board
Since, in the real world, we have gravity to bring the chips into the lowest place in the column, we need to emulate the real world in our 2d array by finding the lowest zero in a column.
Basically, the chip dropping into the open space in the column, as shown by the gif down below, is what we are trying to accomplish in our 2d array down below.

To do this, we can iterate a column in an array till we find a value that isn’t 0 or we reach the length of the array, like below.

The image above in code will look something like this:
//finds the lowest open square to drop the tile in and returns the row

public int BottomDrop(int[][] g, int col) { //g = the 2d array of the game, and col = designated column
    int row = -1;
    for (int i = 0; i < g.length; i++) {
        if (g[i][col] == 0) { //keeps moving the column until row != 0
            row = i;
        } else {
            break; //Sorry for this ugly break :)
        }
    }
    return row; //if row == -1, that means the column is full
}
In action, this is what it looks like:
Hooray!
However, we are not finished with the game; we still have to check whether a player has won the game by achieving four chips in a row.
Game Checking
Though there are many different ways to check whether a game has been won, I will simply highlight my version of doing the checking.
In Connect Four, there are 3 ways a player can win the game. They can win by connecting 4 chips of their color in a row, column or a diagonal.

In order to check whether a player has won or not, I believe that we can use the 2d array to check for such a situation.
The principle is really the same for all 3 game winning situations. Consider the example for checking for a win in a row.
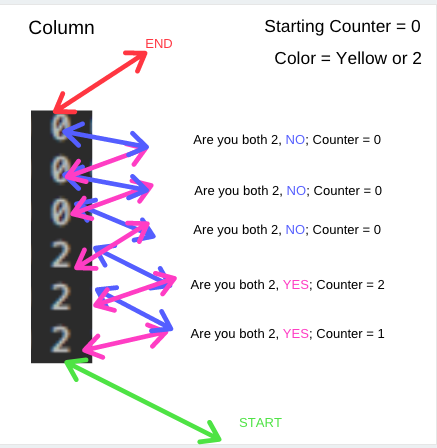
To begin with, we will only need to consider checking for the player of color that most recently has moved, since it is only at that this time a game winner can occur. Consider the following:

The only color that has potential to win the game in the above scenario is the one that just moved, which is Yellow. Since we know the row & column of the recent move and the color that has moved, we can now check whether a 4 in a row or column occurred.
These are some examples on how we can check:
The pictures above show the main principle of checking. Since we know what the row & column of the latest move, we only need to check in that row & col whether a game has been won. Furthermore, we are using a counter to keep track of how many same color chips that exist. If 2 chips next to each other are the same and are of the color we are checking for, we increment the counter. However, if those 2 chips are not of the color we are checking for, we immediately set the counter to 0.
Diagonal checking, however, is a bit tricky as you must find the possible diagonal spaces for the latest move, but the principle is the same as the row & the column.
Here is a full game played with the checking enabled:
That is it guys!
Thank you for reading this far. If you enjoyed the content, please feel free to give a clap, and if you didn’t enjoy the content, please feel free to give me constructive criticism.
Thank You and have a Nice Day!


コメント